Are you an aspiring artist seeking to create a masterpiece? Want to replicate the famous Rembrandt-style lighting? Perfect your artistry with a colorful twist and craft a painting like a true master! With our tutorial, you'll be able to create works of art that exude life and vibrancy. Read on to learn how to unleash the Rembrandt within!
Unleash the Rembrandt Within!
Do you admire the beautiful art of Rembrandt? Perhaps you've seen his many oil paintings that capture the beauty of everyday life in a unique way. His use of light and color is unmistakable; it's no wonder he is still celebrated today. We can learn a lot from the Dutch master - and create our own masterpiece with Rembrandt-style lighting!
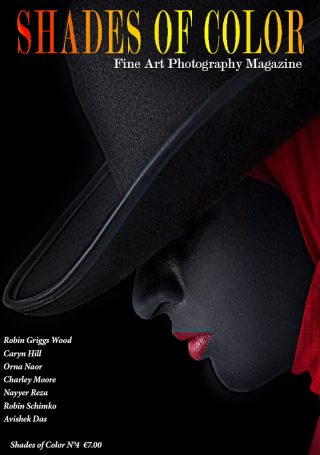
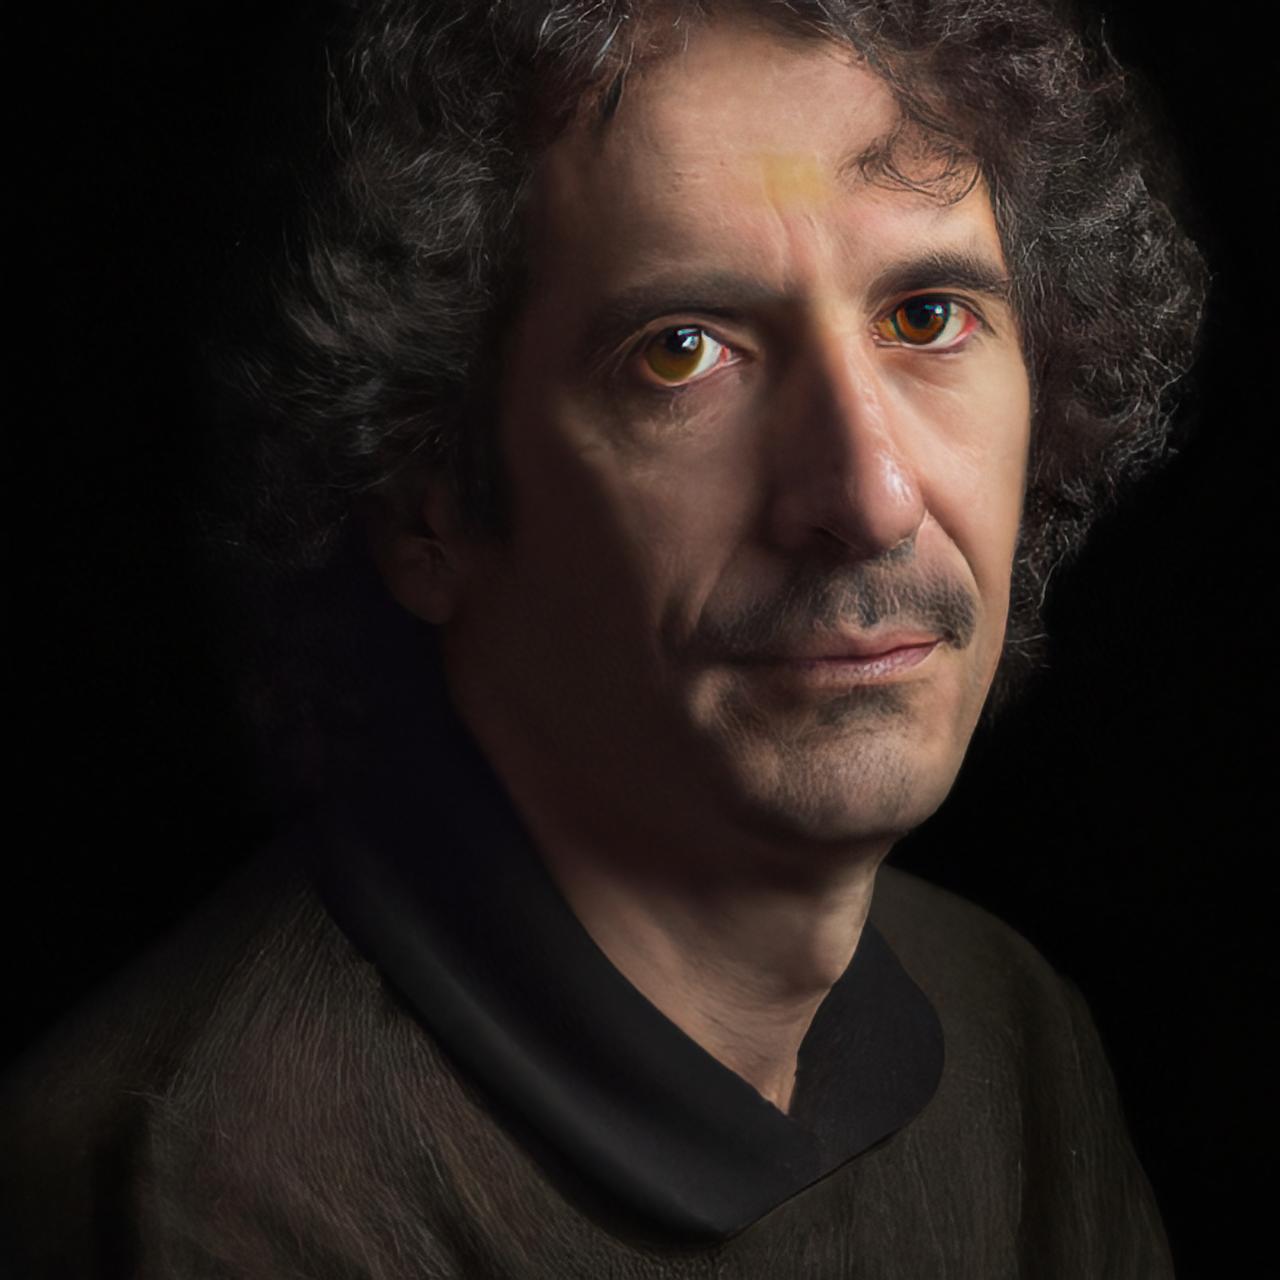
When trying to recreate Rembrandt's artistry, it's important to remember the core principles of his style. His paintings were characterized by intense lighting, with a focus on the face and its features. He used light and shade to create a sense of volume and depth, a technique known as chiaroscuro. By mastering the basics, you can create a colorful painting that looks like it was painted by Rembrandt himself.
Bringing Life to the Canvas with Color
Rembrandt's paintings were usually in black and white, but you don't have to limit yourself to those colors. By adding color to your painting, you can bring life and vibrancy to the canvas. A splash of color against the darkness can really make your painting stand out, and add a unique twist to the classic Rembrandt-style.
In particular, try adding a light source. This could be natural or artificial light, or even a neon or pastel hue. Whatever color you choose, it will create a unique atmosphere in your painting and bring a dramatic element to your art. You can also experiment with different shades to create depth and shadow. Play with different colors and see what works best for your painting.


Colorful Lighting Techniques from the Master
Once you have chosen a color for your painting, it's time to master the art of Rembrandt-style lighting. This technique involves playing with light and shade, so that the focus is on the face and its features. Use the light source to create shadows and highlights, and make sure to place it correctly. Rembrandt usually placed the light source on the right side of the face, which created a beautiful contrast.
Once you have mastered the basics, try experimenting with more advanced techniques. For example, you can change the color of the light source to create different moods and effects. The color can also be used to create a vivid atmosphere, which is great for creating a dramatic scene.
Here's a lighting diagram for a Rembrandt-style portrait:
Key light: This is the main light source and should be placed 45 degrees to the right of the subject, and slightly above their eye level. The key light should be brighter than the other lights in the setup.
- Fill light: This light should be placed on the opposite side of the key light, and should be used to fill in shadows created by the key light. The fill light should be less bright than the key light, but still bright enough to remove any deep shadows.
- Background light: This light should be placed behind the subject and aimed towards the background. The purpose of this light is to separate the subject from the background and add depth to the scene.
- Rim light: This light should be placed behind the subject, and aimed towards the back of their head and shoulders. The rim light will create a bright outline around the subject and add separation between them and the background.
In terms of placement and intensity, the key light should be the brightest, followed by the rim light, fill light, and background light. To get the classic Rembrandt-style look, the key light should create a triangle of light on the subject's face, with one side of the triangle on their cheek, and the other two sides on their forehead and chin.It's important to note that the lighting setup can be adjusted based on the specific look you are trying to achieve. Feel free to play around with the positioning, intensity, and type of lights to find the perfect setup for your portrait.

Creating a Colorful Masterpiece!
Once you have mastered the art of Rembrandt-style lighting, it's time to create your own masterpiece! Choose a subject, add some colors, and craft a painting that you can be proud of. Remember to experiment with different colors and hues, and play with light and shadow to bring your ideas to life. With a little practice and dedication, you'll be able to create a colorful Rembrandt-style painting that looks like it was painted by the master himself!
Creating a Rembrandt-style painting doesn't have to be daunting. With the right techniques and a bit of practice, you can create a masterpiece that you can be proud of. Don't forget to add colors to bring life to your painting, and play with light and shadow to create a vibrant masterpiece that looks like it came straight from a museum! So, unleash the Rembrandt within and start creating beautiful art that will last for generations.
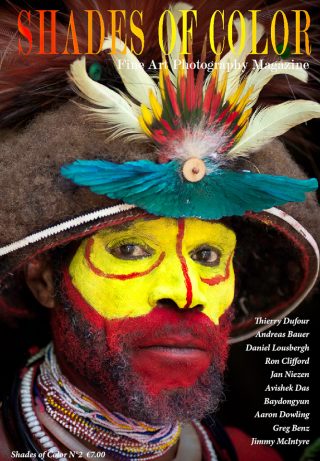
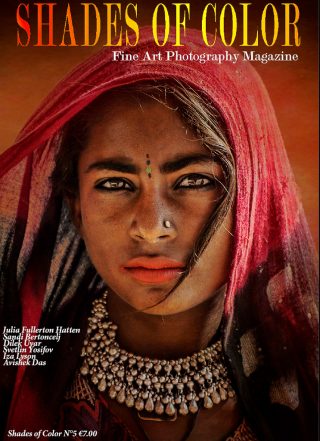
Choose your subject: Choose a person who has strong and distinctive features. A person with prominent cheekbones, strong jawline, and deep-set eyes works best for this style of portrait.
- Set up your lighting: The key light should be placed 45 degrees to the subject's right, and slightly above their eye level. The fill light should be placed on the opposite side of the key light. The background light should be placed behind the subject, and the rim light should be placed behind the subject and towards the back of their head and shoulders.
- Position your subject: Have your subject face directly towards the camera and turn their head slightly to the right so that the key light is shining on their face. This will create a triangular pattern of light on their face.
- Take the photo: Use a camera with manual controls to take the photo. Adjust the aperture, shutter speed, and ISO to get the desired exposure for the lighting conditions. Make sure the key light is brighter than the other lights in the setup.
- Import the photo into a photo editing software: Use your favorite program. I use a mix of apps from Affinity, Skylum, and ON. depending on the style of image I am looking for.
- Adjust the levels: Use the levels adjustment tool to adjust the brightness and contrast of the photo. The goal is to make the triangular pattern of light more prominent.
- Paint in color: Use the brush tool to paint in a color to the photo. Start with the face and work your way outwards. Use different shades to create depth and shadow. Stay true to the classic Rembrandt style, which uses warm and rich colors, such as deep reds, oranges, and yellows.
- Adjust saturation: Use the saturation and hue sliders to adjust the overall color balance of the photo.
- Final touches: Use the dodge and burn tools to brighten or darken certain areas of the photo. Adjust the opacity and flow of the brush to get the desired intensity of color. Use the clone tool to remove any blemishes or distracting elements in the photo.
- Save and share: Save the final image and share it with others.
Remember to be creative and have fun with it. Experiment with different color combinations and effects, and don't be afraid to try something new. Following these steps, you can create a unique and vibrant Rembrandt-style color portrait.